Picnic Potato Salad with No Mayonnaise
Picnic Style Pesto Turkey and Avocado Bacon Sandwich.
14 recipes found
Place potatoes in a large pot and cover with lightly salted water; bring to a boil. Reduce heat to medium-low and simmer until tender, 10 to 15 minutes; drain.
Whisk oil, vinegar, basil, mustard, salt, and black pepper together in a large bowl. Add potatoes and onion; toss gently to coat. Set aside until cool, about 30 minutes.
Fold blue cheese and chives into potato salad until blended.
1. To make the dressing. Combine all ingredients in a bowl or glass jar. Taste and adjust the salt and pepper.
2. To make the sandwich. Mix the Caesar dressing and pesto in a bowl.
3. Lay the bread cut side up on a cutting board. Working with the top piece of ciabatta, pull out some of the insides to create a space for the filling. Spread the pesto Caesar dressing over both cut sides of the bread. Mash the avocado with a fork and season with salt. Layer on the cheese and mashed avocado. Now, layer on the turkey, bacon, greens, and pickles. Add the top half of the ciabatta and gently push down on the sandwich.
4. At this point, you can slice the sandwich and serve, or wrap the sandwiches tightly and place in the fridge for a few hours. Before serving, cut 6-8 sandwiches.
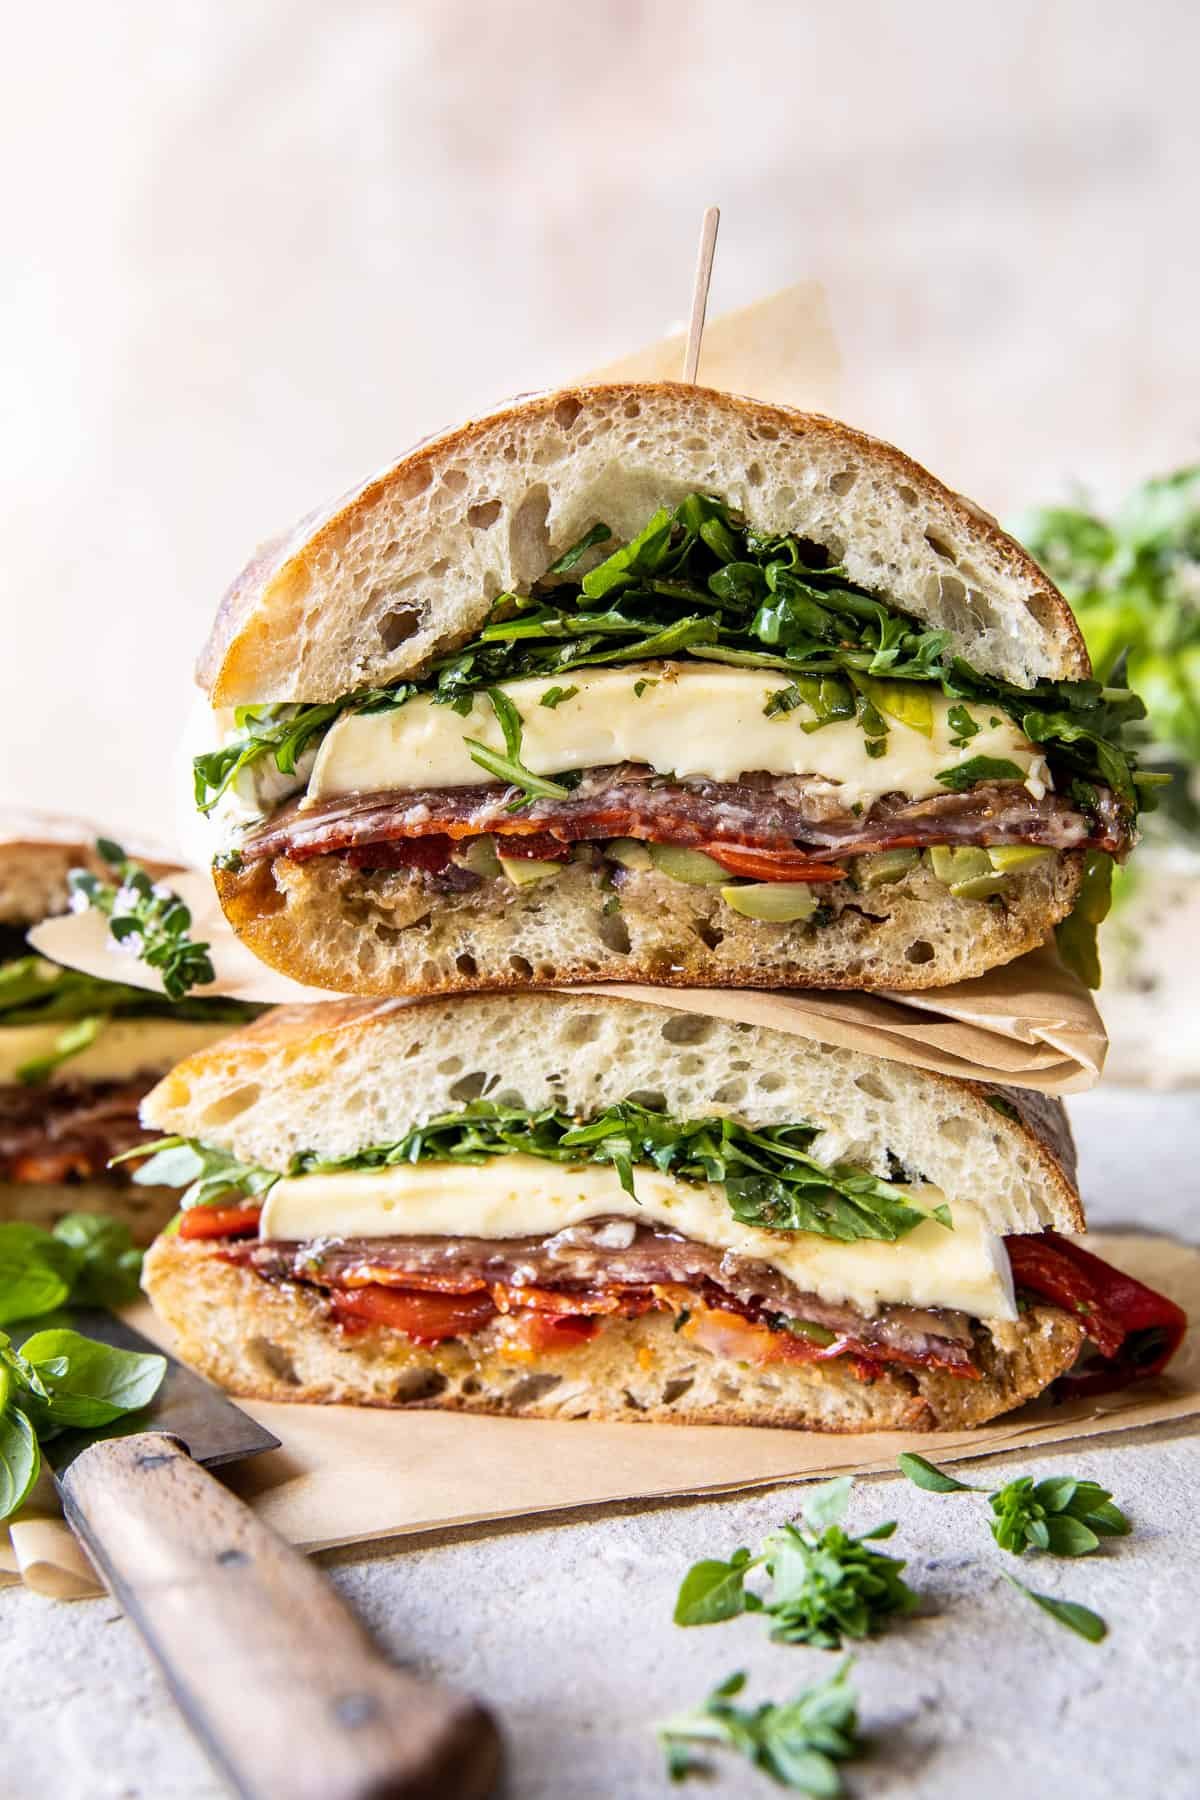
1. To make the vinaigrette. Combine all ingredients in a glass jar and whisk until smooth. Taste and adjust the salt and pepper.
2. Lay the bread cut side up on a cutting board. Working with the top piece of ciabatta, pull out some of the insides to create a space for the filling. Drizzle both cut sides of bread with vinaigrette. Then, layer on the olives, bell peppers, assorted meats, and Brie. Sprinkle the arugula over the brie and drizzle generously with the vinaigrette. Add the top half of the ciabatta and gently push down on the sandwich.
3. At this point, you can slice the sandwich and serve or wrap the sandwich tightly and place in the fridge for up to 1 day. Before serving, cut 6-8 sandwiches.
In a small bowl, add the anchovy and 2 tablespoons olive oil. Use a fork to mash the anchovy until dissolved in the oil. I like to use a wooden bowl because I find it easier to mash the anchovy against its textured sides.
Simply Recipes / Lori Rice
:max_bytes(150000):strip_icc():format(webp)/Simply-Recipes-Muffuletta-METHOD-01-6c6c1a9528d54bb2873c9c6882a47d89.jpg)
In a medium bowl, add the mashed anchovy with the oil, kalamata and green olives, celery, carrot, cauliflower, garlic, capers, red wine vinegar, oregano, and black pepper. Stir to combine.
Simply Recipes / Lori Rice
:max_bytes(150000):strip_icc():format(webp)/Simply-Recipes-Muffuletta-METHOD-04-acc134e303e441cdb65db9b167aa0ec6.jpg)
Add enough olive oil to just cover the salad. For the best flavor, let it marinate for at least 1 hour at room temperature or overnight in the fridge.
Stir the salad, taste, and add more black pepper or vinegar if you’d like. It probably does not need more salt because the olives, anchovy, and capers are salty enough.
You will have about 4 cups of olive salad, of which you will use about 2 cups in the sandwich. Think of the leftovers as a gift for tossing with pasta, to spoon over cream cheese for dipping, or to make another muffuletta! It will keep, covered in oil and refrigerated, for at least 1 month.
Simply Recipes / Lori Rice
:max_bytes(150000):strip_icc():format(webp)/Simply-Recipes-Muffuletta-METHOD-05-1e59c743b49142909df795e682e13295.jpg)
Slice the loaf of bread in half horizontally and use your hands to hollow out each half by removing the soft bread inside. This will create cavities for the filling. Leave 1/2-inch of soft bread near the crust, taking care not to tear through the crust.
Simply Recipes / Lori Rice
:max_bytes(150000):strip_icc():format(webp)/Simply-Recipes-Muffuletta-METHOD-08-4d61e095516e477ab5c955739d5050af.jpg)
Stir the salad once more to reincorporate the oil and seasonings, then spread about 2 cups total on the 2 pieces of bread. Use the back of a spoon to really smoosh it down into the bread, covering the entire surface.
Simply Recipes / Lori Rice
:max_bytes(150000):strip_icc():format(webp)/Simply-Recipes-Muffuletta-METHOD-10-651a633f258544efa97aedea811d464c.jpg)
Layer the salami, capicola, mortadella, mozzarella, and provolone on the bottom piece of bread. Carefully flip the top piece of bread on top.
Simply Recipes / Lori Rice
Simply Recipes / Lori Rice
Simply Recipes / Lori Rice
Simply Recipes / Lori Rice
:max_bytes(150000):strip_icc():format(webp)/Simply-Recipes-Muffuletta-METHOD-11-f1125fbdb4194c848b3b4391e20cff6e.jpg)
Tightly wrap the muffuletta with foil and allow it to sit for at least 1 hour at room temperature for the flavors to marry and the oil to soak into the bread.
Simply Recipes / Lori Rice
Simply Recipes / Lori Rice
:max_bytes(150000):strip_icc():format(webp)/Simply-Recipes-Muffuletta-METHOD-16-8db2250b068a4dad9535d363011b1524.jpg)
Remove the foil and cut the muffuletta into 4 wedges and serve.
Tightly wrap any leftover sandwich with plastic wrap or foil and store in the refrigerator for up to 3 days. The leftover olive salad will keep for 1 month if covered with olive oil in a sealed container in the refrigerator.
Did you love the recipe? Leave us stars below!
Simply Recipes / Lori Rice
:max_bytes(150000):strip_icc():format(webp)/Simply-Recipes-Muffuletta-METHOD-18-f4094cc3645e449cbff989a3d64ebb10.jpg)
Toss all the salad ingredients together in a bowl.
Pulse the dressing ingredients in a food processor until smooth. Pour over the salad ingredients and toss to combine.
Serve immediately! Add more orange juice to add more moisture as needed.
Saute peppers and onion until soft. Cool for 5-10 minutes.
Combine first 7 ingredient (through cheese) and refrigerate. If you want to add cayenne, now’s a good time.
Just before serving, add Fritos!
In a large pot of salted boiling water, cook pasta until al dente, rinse under cold water and drain.
In a large bowl, combine pasta and vinegar. Mix well and allow to sit 15-20 minutes.
Add cheese, peppers, celery, green onions, tomatoes, mayonnaise and seasonings. Mix well and refrigerate until chilled.
Whisk Dijon mustard, cider vinegar, rice vinegar, salt, sugar, and cayenne together in a large bowl for about 30 seconds. Whisk in olive oil in 1-teaspoon increments until emulsified. Whisk in tarragon, dill, parsley, chives, and thyme. Remove and reserve 1/2 of the dressing in a separate small bowl.
Bring a large pot of lightly salted water to a boil; cook pasta at a boil until tender yet firm to the bite, about 8 minutes. Add snow peas, carrots, peas, and broccoli about 2 minutes before the pasta is done. Drain pasta and veggies well, but do not rinse.
Transfer hot pasta mixture to the vinaigrette in the large mixing bowl and toss well to combine. Let rest for 5 minutes and toss again. Toss occasionally until the mixture is almost room temperature, 15 to 20 minutes.
Add bell peppers, cherry tomatoes, red onion, green onions, salt, and the reserved dressing and toss well.
You can serve this right away, but for best results, cover with plastic wrap and chill in the refrigerator for 4 to 6 hours. Toss and adjust seasoning before serving.
:max_bytes(150000):strip_icc():format(webp)/9233661-7049dfea4c30464fb93ce8be65b69194.jpg)
Preheat the oven to 350 degrees F (175 degrees C). Grease an 8x8-inch baking dish and set aside.
Stir zucchini, apple, brown sugar, eggs, olive oil, and vanilla together in a large bowl until well combined.
Sift flours, cocoa powder, baking soda, salt, and baking powder together in a separate bowl; stir gently into zucchini-apple mixture until fully incorporated. Spoon batter into the prepared baking dish. Sprinkle chocolate chunks and pepitas over the top of batter.
Bake in the preheated oven until a toothpick inserted into the center of cake comes out clean, about 25 minutes. Let cool before slicing.
Lightly spray an 8 x 8-inch square baking pan with cooking spray. Line the pan with parchment paper that is cut to fit inside the pan with a 1-inch overhanging the sides. This will help you lift the rice krispie treats out of the pan. Lightly spray the parchment paper.
Simply Recipes / Irvin Lin
Simply Recipes / Irvin Lin
:max_bytes(150000):strip_icc():format(webp)/Simply-Recipes-Rainbow-Rice-Krispie-Treats-METHOD-01-2c97d44fb832408d8b1e688c7778face.jpg)
Lightly spray a large microwave safe bowl and a silicon spatula with cooking spray. Place 2 1/2 ounces (about 12) marshmallows and 1 tablespoon butter in the bowl. Microwave on high for 1 minute or until the marshmallows are big and puffy. Immediately add 1/4 teaspoon vanilla and stir it with the oiled spatula until most of the marshmallows are melted.
Simply Recipes / Irvin Lin
Simply Recipes / Irvin Lin
Simply Recipes / Irvin Lin
:max_bytes(150000):strip_icc():format(webp)/Simply-Recipes-Rainbow-Rice-Krispie-Treats-METHOD-10-60dadca8a50d45e98e1ead2549036ede.jpg)
Stir in 12 drops of red food coloring and 10 drops of blue food coloring, mixing thoroughly until uniform in color.
Simply Recipes / Irvin Lin
Simply Recipes / Irvin Lin
:max_bytes(150000):strip_icc():format(webp)/Simply-Recipes-Rainbow-Rice-Krispie-Treats-METHOD-05-d3f8394f144647a1b913d7849e7ffd3d.jpg)
Add 1 1/4 cups cereal and stir to fully incorporate. Scrape the mixture into the prepared pan.
Simply Recipes / Irvin Lin
Simply Recipes / Irvin Lin
:max_bytes(150000):strip_icc():format(webp)/Simply-Recipes-Rainbow-Rice-Krispie-Treats-METHOD-07-79ce2a2274784ad79f6923c315fbf8e1.jpg)
Lightly spray your hands with cooking spray and spread the colored rice krispies into a thin even layer, covering the whole pan. The parchment paper will move around while you do this. Just try your best to hold it into place or adjust it as needed. Respray your hands if they get sticky. Try to work quickly before the mixture hardens.
Simply Recipes / Irvin Lin
:max_bytes(150000):strip_icc():format(webp)/Simply-Recipes-Rainbow-Rice-Krispie-Treats-METHOD-09-e270338c64504c5e9b259d27b4385037.jpg)
Wash and dry the bowl and spatula. Repeat this process starting with step #2 above. You will have 5 more colored layers using the following:
Simply Recipes / Irvin Lin
Simply Recipes / Irvin Lin
:max_bytes(150000):strip_icc():format(webp)/Simply-Recipes-Rainbow-Rice-Krispie-Treats-METHOD-11-06e1608a02904b74bc3787ed31cc55fc.jpg)
Once you’re done with the last layer, which will be red, sprinkle some sea salt on top, if using. Let the rice krispies cool for a minimum of 1 hour, then lift it out of the pan using the overhanging parchment paper. Place it on a cutting board and peel off the parchment paper.
Use a sharp chef’s knife to cut it into 12 pieces and celebrate pride with a big bite of fabulousness.
Did you love the recipe? Leave us stars below!
Simply Recipes / Irvin Lin
Simply Recipes / Irvin Lin
:max_bytes(150000):strip_icc():format(webp)/Simply-Recipes-Rainbow-Rice-Krispie-Treats-METHOD-13-38116ce49dd345dfb9f0ea64f845223d.jpg)
Toast the almond slivers in a dry nonstick or cast-iron skillet on medium high, stirring frequently until browned. Set aside.
Combine cabbage, snow peas, radishes, green onions, cilantro in a large bowl. Can make this step a day or two ahead.
In a separate bowl, whisk together the rice vinegar, sugar, soy sauce, garlic, sesame oil, ginger, and cayenne until sugar has dissolved. Whisk in the mayonnaise.
When ready to serve, gently combine the dressing and almonds with the cabbage mixture.
In a large bowl, mix the 3 different types of beans, the celery, onion (drained of soaking water), parsley, and rosemary.
Simply Recipes / Elise Bauer
Simply Recipes / Elise Bauer
:max_bytes(150000):strip_icc():format(webp)/__opt__aboutcom__coeus__resources__content_migration__simply_recipes__uploads__2006__05__three-bean-salad-method-1-5e7239d51172498985c5b491a6cc4f13.jpg)
In a separate small bowl, whisk together the vinegar, sugar, olive oil, salt, and pepper. Add the dressing to the beans. Toss to coat.
Transfer the salad to the refrigerator for several hours, to allow the beans to soak up the flavor of the dressing. Let come to close to room temperature to serve.
Did you enjoy this recipe? Let us know with a rating and review!
Line a baking sheet with paper towels and set it aside.
Fill a large skillet with oil until it comes 1/4 inch up the sides. Set it over medium heat and heat to 375°F. Working in batches, fry the eggplant slices until tender in the center and golden brown on both sides, 6 to 8 minutes total, flipping them once halfway through.
Make sure the oil comes up to 375°F before frying the next batch. You may need to add more oil too.
Transfer the fried eggplants onto the prepared baking sheet and sprinkle them with sea salt. Set aside.
Simply Recipes / Micah Siva
Simply Recipes / Micah Siva
:max_bytes(150000):strip_icc():format(webp)/Simply-Recipes-Sabich-METHOD-01-dfee1187ca5548cda157ceb66c00a044.jpg)
In a medium bowl, mix together the tomatoes, cucumbers, parsley, lemon juice, salt, and black pepper. Set aside.
Simply Recipes / Micah Siva
:max_bytes(150000):strip_icc():format(webp)/Simply-Recipes-Sabich-METHOD-03-fca67dd6dd3645acb02eba28f8a5b209.jpg)
In a small bowl or liquid measuring cup, whisk together the tahini, garlic, lemon juice, salt, cumin, and black pepper. Whisk in water, 1 tablespoon at a time, until the sauce is smooth and runny. Set aside.
Simply Recipes / Micah Siva
:max_bytes(150000):strip_icc():format(webp)/Simply-Recipes-Sabich-METHOD-04-138ef224e5be449395b75a0b2f86667e.jpg)
In the center of a pita, spread 1 tablespoon hummus. Top with 2 to 3 pieces of fried eggplant, 1 egg sliced lengthwise or crosswise, 3 to 4 tablespoons Israeli salad, and a few pickles. Drizzle in the tahini sauce and amba, if using. Assemble the remaining sabich the same way.
Fold the pita in half and enjoy. This sandwich is meant to be messy!
Have leftovers or want to make extras? Refrigerate each component in separate containers for up to 4 days. They make for easy meals throughout the week.
Did you love the recipe? Leave us stars below!
Simply Recipes / Micah Siva
:max_bytes(150000):strip_icc():format(webp)/Simply-Recipes-Sabich-LEAD-05-54df69792032432f8c40d8a4abc8f1a0.jpg)
Place the onion slices in a bowl and cover with cold water. Let them soak for at least 10 minutes or up to 30 minutes at room temperature, while you prepare the sandwiches.
:max_bytes(150000):strip_icc():format(webp)/__opt__aboutcom__coeus__resources__content_migration__simply_recipes__uploads__2018__08__Pan-Bagnat-METHOD-01-ca525b6166544c96a84478eddfca93c3.jpg)
In a bowl, combine the tuna, its oil, anchovies, olives and 2 teaspoons of red wine vinegar. Stir gently to keep from mashing the tuna chunks.
:max_bytes(150000):strip_icc():format(webp)/__opt__aboutcom__coeus__resources__content_migration__simply_recipes__uploads__2018__08__Pan-Bagnat-METHOD-02-e131ad54949d4222b7ca947be57a182c.jpg)
Slice the baguettes along their length to separate the top from the bottom. Remove some of the soft crumb inside the top and bottom of the bread to make room for the filling.
Rub the insides with the garlic clove. Brush with olive oil and sprinkle with vinegar, salt, and pepper.
:max_bytes(150000):strip_icc():format(webp)/__opt__aboutcom__coeus__resources__content_migration__simply_recipes__uploads__2018__08__Pan-Bagnat-METHOD-03-e08e5a64af2b424882d06943739667bd.jpg)
Distribute the tuna mixture evenly in the bottoms of the baguettes. Top with the red onion, eggs slices, tomatoes and basil. Drizzle with more olive oil, and sprinkle on salt and pepper.
Top the sandwiches with the tops of the baguettes, and wrap each tightly in plastic wrap.
:max_bytes(150000):strip_icc():format(webp)/__opt__aboutcom__coeus__resources__content_migration__simply_recipes__uploads__2018__08__Pan-Bagnat-METHOD-04-44f70b2011de4e75813a0e498aa06232.jpg)
Place the wrapped sandwiches side-by-side on the counter and set a cutting board on top. Place a heavy pot or skillet on top, and place a few canned goods inside to weight it down even more.
Press the sandwiches for 10 minutes, turn them over, and continue to press for another 10 minutes on the other side.
:max_bytes(150000):strip_icc():format(webp)/__opt__aboutcom__coeus__resources__content_migration__simply_recipes__uploads__2018__08__Pan-Bagnat-METHOD-12-7907018eb39047b4a329073a861aa47d.jpg)
With the sandwiches still wrapped in plastic, use a serrated knife to cut them into individual servings.
The sandwiches are ready to eat now, or they can be packed into a picnic basket or lunch box and eaten within about two hours from now. The sandwiches taste best at room temperature.
Did you love the recipe? Give us some stars and leave a comment below!